This tutorial is based on a save the date card I designed and produced for my wedding, but the same technique could be easily applied to invitations, programs, escort cards, etc. To begin, you will need the following:
- Graphic design program to create design and export PDF of design for plate making, I used Adobe Illustrator CS6
- Custom polymer plates
- Lifestyle Crafts Letterpress Combo Kit, with Epic 6 Tool
- Letterpress ink
- Bearing strips- If you order plates from Boxcar Press, they will ship you the plate edges for use as bearing strips for free…just let them know!
- Letterpress paper- I used Crane’s Lettra 110 lb. 100% cotton paper
- Soft rubber brayer- widely available at your local art supply or try this one: 6in Soft Rubber Brayer (SBA4129)
- A second person
- PATIENCE
Begin by reading this great post from Boxcar Press that details how to get great results with the L letterpress machine. I will explain my personal experiences and recommendations assuming that you have read Boxcar Press’ suggestions.
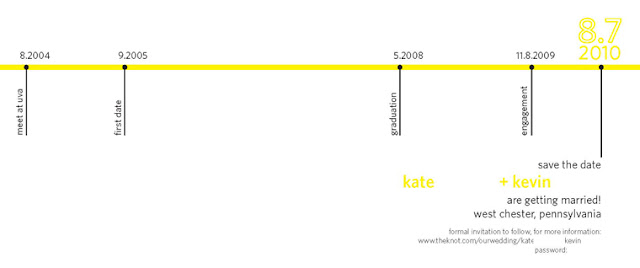
First you need a design. You can create the design yourself using any software that will allow one to one drawing and can export a high quality PDF. Alternatively, you could hire a graphic designer to create the PDF for you. Below is an image of my design created using Adobe Illustrator. You will need a separate plate for each color. I decided to keep the spacing in tact, meaning one big plate for the gray and one big plate for the yellow, this saves a lot of time when you are affixing the plates to the pressing folder.
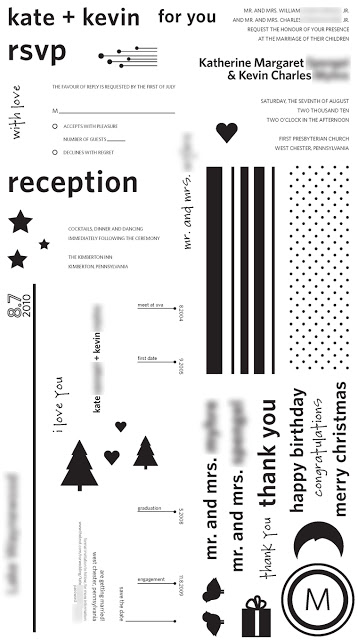
I made the black and white file above based on Boxcar Press’ platemaking machine dimensions. The machine must print a set width, so you might as well fill all available space with designs. I was careful to arrange the designs so I could cut out “whole” plates for each color. I also knew that I was going to make my invitation suite in the same way, so I included all the invitation plates in this file to save time and money. See my cut diagram below:
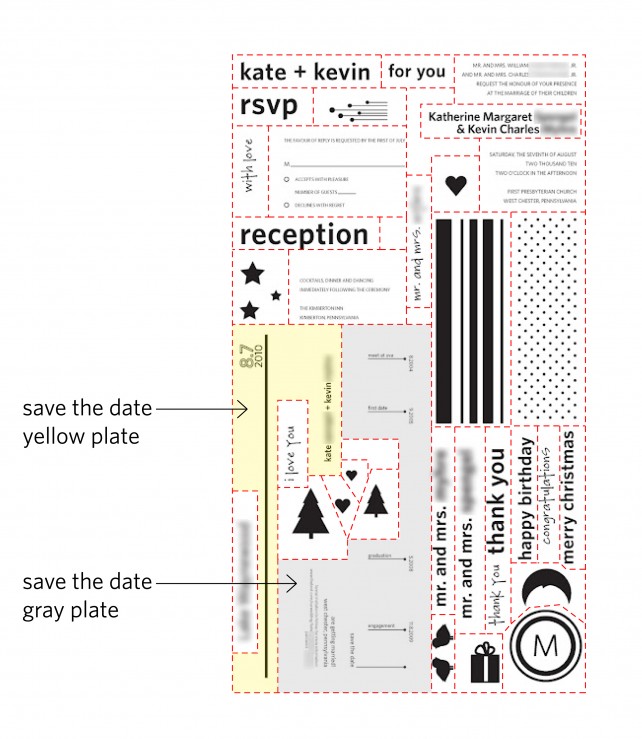
You can see in the highlight plates how they are cut to keep text and design items connected on one plate per color. This makes it much easier to align and register your different colors.
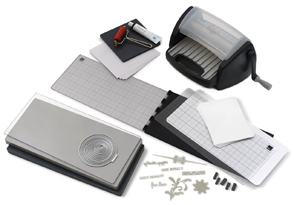
The image above shows the L letterpress machine and letterpress folder. In addition to this kit, I purchased a larger (6″) soft rubber brayer, block-printing ink, and paper. As mentioned above, I used Crane’s Lettra 110 lb. cover paper. I purchased 26″ x 40″ sheets in pearl white and had them cut to size at a local printing company. That way I was able to buy the paper in bulk and create a variety of different sizes for every piece of the suite (rsvp cards, thank you notes, invitations, etc.) The great thing about Lettra series papers is you can buy corresponding envelopes.
When you have properly aligned your plates and setup your “gauge pins”, you are ready to print! I found that having my husband (fiance at the time) available to help was imperative. We setup an assembly line where he would position the new sheet of paper and I would ink the plate and remove the bearing strips. Then my husband would crank the pressing folder through the machine. The reason I couldn’t do it by myself is simple, my hands were covered with ink after the first few impressions. This made it impossible for me to pick up the next paper and position it without smudging ink all over the fresh paper.
We did one color at a time, to minimize clean up and setup. We needed about 100 completed cards, so we pressed 140 yellow cards. In retrospect, we wished we had pressed even more “extra” cards. We found it very difficult to get a card with both an acceptable yellow press and gray press. If your colors overlap, think about which color you want to read as “on top” and be sure to press that color last.
Generally, we found that the yellow was easier to press than the gray for two reasons. First, it is harder to pick up imperfections on the edges because it is light in color. Second, the yellow was on the larger and bolder text, making it harder for the ink to bleed.As for the envelopes, if you plan on printing the return address through the printer, keep in mind that they are too thick to roll through most printers. You will need a rear feed printer that allows the envelope to remain flat while it advances.
Overall this was a rewarding DIY project. I was pleased with the end result and especially enjoyed the freedom to create my own design. That being said, it was not an easy project. Go into it with an open mind and a good attitude and you will enjoy this DIY letterpress adventure!